
Photoshop CC 2020 is here!
Here’s our Top 3 Favourite Updates!
1. Improvements to Presets
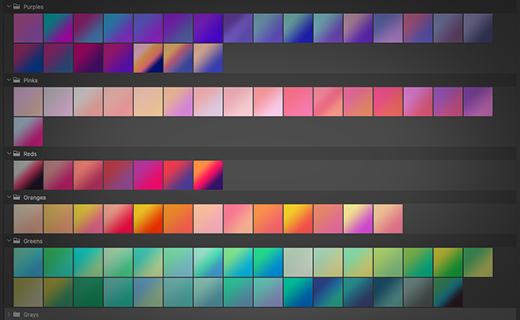
Photoshop has had a make-over when it comes to organisation and display, with the re-imagined Preset Panels.
Navigating to the Application Menu and selecting any of the following from the Window Tab; Swatches, Gradients, Patterns, Shapes and Styles, you’ll now be met with a fantastically revamped, modern user experience.
There’s now completely dedicated panels for Gradients, Patterns, Shapes and Styles with nice and large, easy to see thumbnails. Long gone are the never-used rainbow and dark violet/orange gradients (although you can still access them to compare by loading in Legacy Gradients) Or just see the images attached to this blog, the difference is truly night and day.


In addition to the amazing new gradient presets, we’re lucky enough to have some great new Shapes, Patterns and Styles too. You’ll also find that every Panel mentioned has more structure as well, by categorising content based on appearance.
This is basic, but an amazing update to Photoshop which gives the program more visual appeal, With some small changes, Photoshop now has a more refined modern looking UI when it comes to Presets. We look forward to including these improved presets in our Photoshop training packs.

Selecting objects in Photoshop CC is now much quicker with the Object Selection tool.
2. Object Selection Tool
Okay, this one is amazing! New from Adobe Sensei, the Object Selection tool has taken the process of Quick Selection to a whole new level. Say you’re Quick Selecting, continuously clicking, resizing the brush to get in tight corners, accidentally selecting pixels outside of the area you intended, then having to work in subtract or perform a Ctrl/Cmd + Z. etc. All you wanted to do was quickly select something with the Quick Selection Tool. In the end you find sometimes it’s just not that quick, even considering the advancements of the tool, it seems to have its limits.
Well no more will you have to worry about over clicking, or the wrong sized brush, the Quick Selection Tool still has its place as a slow-down selection tool, but what if you just want to grab something out of a scene with speed? Now you can! Find the object in that scene, navigate to the Object Selection Tool, then drag a bounding box or a lasso over the desired area/s, and just like magic, the Object Selection Tool does the rest.
The Object Selection Tool is essentially designed for speed selecting assets and is most effective when there is clear contrast of pixels. Essentially it’s the Quick Selection Tool, yet faster, and possibly cruder in the way it operates, however it’s all dependent on the source image as to how effective this tool will be.
- To access the Object Selection Tool, navigate to where the Magic Wand and Quick Selection Tools are housed and you’ll now find the Object Selection Tool as well.
- In addition to this, you‘ll also have the choice to toggle between Rectangular and Lasso Selection Mode, via the Control Panel located at the top of the screen.
- You’ll also have the option to sample all layers as well.
- The Object Selection Tool is also located in the Select and Mask Workspace, so don’t stress about getting the perfect pass the first time, you can always refine your selection in the additional workspace, along with the various other Selection and Refinement Tools.
A great new addition to Photoshop 2020 that our Photoshop trainers love.
Photoshop’s Transform Warp tool is now more flexible and intuitive than ever.
3. Transform Warp
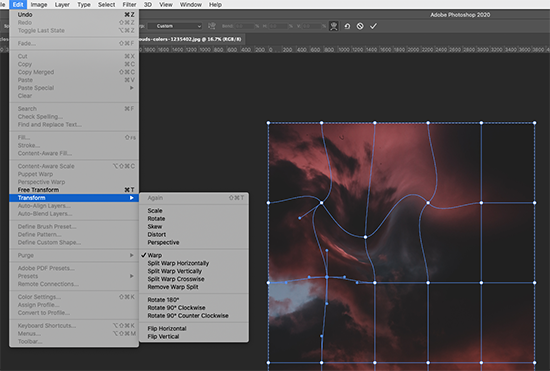
Most of the time, the basic Transform Controls Photoshop users work with are the standard Scale, Rotate, Distort, Perspective and Skew. In addition to this, there is Warp. Warp is more of a specialist tool, it’s useful for giving objects more dimension in their appearance, it’s also helpful when you require a layer to bend in a way none of the above mentioned Transform Controls will allow. Warp is rather simple, each intersection of lines are met with Nodes (Circles), by simply dragging these points, you change the appearance of your imagery drastically in a fluid structure.
Warp, up until this Photoshop Update (version 21.0) has always been rather primitive. Designers will sometimes use Puppet Warp or Liquify to achieve more complex bending of pixels. However, Warp’s had a revision in this latest update, allowing for a degree of control, previously unknown to Photoshop.
The update has come with a series of advancements, previously there was no way to add to the grid.
- Now Users have the power to use preset grid size options: 3 x 3, 4 x 4 and 5 x 5, allowing for a much more refined approach to Transform Warp.
- If that wasn’t enough, you can also custom size Gridlines to a maximum of 50 x 50. This gives a huge about of creative control over how an image can bend.
- In addition, if you add too many lines to the Grid, you do have the option to remove some, in the same way you can remove Guides, simply select the line you wish to delete, then tap the Delete Key.
- There’s also options for splitting the canvas various ways, all based on where you decide to place lines.
- Finally, probably the best feature of all, you can now undo various steps using Ctrl/Cmd + Z, whereas previously you could only undo one action inside a Transform Warp Control.
The future of Warp is here and it functions perfectly! For Photoshop training that can be tailored to include all these new features, please get in touch today.